
HOUSE PLANTS
An excerpt from the Texas Master Gardener Handbook
Compiled at Texas A&M University by
Douglas F. Welsh, Extension Horticulturist
Samuel D. Cotner, Extension Horticulturist
Texas A&M University
Note: A searchable database of common houseplants and other interior foliage plants can be found in the Aggie Horticulture PicturePages section.
INTRODUCTION
This chapter is designed to familiarize you with the basic aspects of tropical plant care rather then attempting to acquaint you with specific cultural requirements of the more than 250 commonly grown plants in the foliage industry. Bear in mind that in most cases, homes and offices are environments poorly suited to the needs of tropical plants. Thus the task of the house plant owner/enthusiast is to select plants that can best withstand indoor conditions of a specific location.
SELECTING AN INTERIOR PLANT
Select only those foliage plants which appear to be insect and disease free. Check the undersides of the foliage and the axils of leaves for signs of insects or disease. Select plants that look sturdy, clean, well potted, shapely, and well-covered with leaves.
Choose plants with healthy foliage. Avoid plants which have yellow or chlorotic leaves, brown leaf margins, wilted or water soaked foliage, spots or blotches and spindly growth. In addition, avoid leaves with mechanical damage, and those which have been treated with "leaf shines" which add an unnatural polish to the leaves. Plants which have new flowers and leaf buds along with young growth are usually of superior quality.
Remember that it is easier to purchase a plant which requires the same environmental conditions your residence has to offer than to alter the environment of your home or office to suit the plants.
Transporting House Plants
When transporting plants, remember the two seasons of the year that can cause damage to the plants, the hot summer and the cold winter months. In the summer, avoid placing plants in a car and leaving the car shut up, because temperature will rise and destroy the plant in a short period of time. If you have to travel for any distance at all, the plant can be burned by the sun shining on it even though the air conditioner is on and the temperature is comfortable in the car. Shade the plant from direct sun while it is in the car.
During winter months, wrap plants thoroughly before leaving the store to carry them to your car. A short run from the store to the car in very low temperatures can kill or severely damage plants. Wrap plants thoroughly with newspaper or paper bags, and place in the front of the car and turn on the heater. The trunk of most cars is too cold to carry plants safely during winter months.
On an extended trip make special arrangements so that plants will not be frozen or damaged by cold weather. Many foliage plants will be damaged considerably if the temperature drops much below 50o F., so maintain as warm a temperature as possible around these plants when transporting them from one location to another.
Acclimatization
Research done in Florida in the late 1970's revealed an interesting phenomenon. Tropical plants grown in full sun have leaves (so called sun leaves) which are structurally different from the leaves of plants grown in shade (shade leaves). Sun leaves have fewer chloroplasts and thus less chlorophyll. Their chloroplasts are located deep inside the leaves and the leaves are thick, small and large in number. Shade leaves have greater numbers of chloroplasts and thus more chlorophyll, are thin, large and few in number. When plants are grown in strong light they develop sun leaves which are photosynthetically very inefficient. If these same plants are placed in low light, they must either remake existing sun leaves or drop their sun leaves and grow a new set of shade leaves which are photosynthetically more efficient. To reduce the shock which occurs when a plant with sun leaves is placed in shade, gradually reduce the light levels it is exposed to. This process is called acclimatization. The homeowner should acclimatize plants when placing them outdoors in summer by gradually increasing light intensities and reversing the process before plants are brought indoors in the fall. For newly purchased plants, acclimatize them by initially locating them in a high light (southern exposure) area of your home and gradually moving them to their permanent darker location over a 4 to 8 week period.
ENVIRONMENTAL FACTORS
Light, water, temperature, humidity, ventilation, fertilization, and soil are chief factors affecting plant growth, and any one of these factors in incorrect proportions will prevent proper plant growth indoors.
Light
Light is probably the most essential factor for house plant growth. The growth of plants and the length of time they remain active depend on the amount of light they receive. Light is necessary for all plants because they use this energy source to photosynthesize. When examining light levels for tropicals, consider 3 aspects of light: (1) intensity, (2) duration and (3) quality.
Light intensity influences the manufacture of plant food, stem length, leaf color, and flowering. A geranium grown in low light tends to be spindly and the leaves light green in color. A similar plant grown in very bright light would tend to be shorter, better branched, and have larger, dark green leaves. House plants can be classified according to their light needs, such as high, medium and low light requirements. The intensity of light a plant receives indoors depends upon the nearness of the light source to the plant (light intensity decreases rapidly as you move away from the source of light). The direction the windows in your home face will affect the intensity of natural sunlight that plants receive. Southern exposures have the most intense light, eastern and western exposures receive about 60% of the intensity of southern exposures, and northern exposures receive 20% of a southern exposure. A southern exposure is the warmest, eastern and western are less warm and a northern exposure is the coolest. Other factors which can influence the intensity of light penetrating a window are the presence of curtains, trees outside the window, weather, seasons of the year, shade from other buildings and the cleanliness of the window. Reflective (light colored) surfaces inside the home/office will increase the intensity of light available to plants. Dark surfaces will decrease light intensity.
Day-length or duration of light received by plants is also of some importance, but generally only to those house plants which are photosensitive. Poinsettia, kalanchoe, and Christmas cactus bud and flower only when day-length is short (11 hours of daylight or less). Most flowering house plants are indifferent to day-length.
Low light intensity can be compensated by increasing the time (duration) the plant is exposed to light, as long as the plant is not sensitive to day-length in its flowering response. Increased hours of lighting allow the plant to make sufficient food to survive and/or grow. However, plants require some period of darkness to develop properly and thus should be illuminated for no more than 16 hours. Excessive light is as harmful as too little light. When a plant gets too much direct light, the leaves become pale, sometimes sunburn, turn brown, and die. Therefore, during the summer months, protect plants from too much direct sunlight.
Additional lighting may be supplied by either incandescent or fluorescent lights. Incandescent lights produce a great deal of heat and are not very efficient users of electricity. If artificial lights are to be used as the only source of light for growing plants, the quality of light (wavelength) must be considered. For photosynthesis, plants require mostly blues and reds but for flowering, infrared light is also needed. Incandescent lights produce mostly red, and some infrared light, but are very low in blues. Fluorescent lights vary according to the phosphorus used by the manufacturer. Cool white lights produce mostly blue light and are low in red light. Foliage plants grow well under cool white fluorescent lights and these lights are cool enough to position quite close to plants. Blooming plants require extra infrared which can be supplied by incandescent lights, or special horticultural type fluorescent lights.
Water
Over- and under-watering account for a large percentage of tropical plant losses. The most common question home gardeners ask is, "How often should I water my plants?" There is not a good answer to this question. Some plants like drier conditions than others. Differences in soil or potting medium and environment influence water needs. Watering as soon as the soil crust dries, results in overwatering.
House plant roots are usually in the bottom two-thirds of the pot, so do not water until the bottom two-thirds starts to dry out slightly. You can't tell this by looking. You have to feel the soil. For a 6-inch pot, stick your index finger about 2 inches into the soil (approximately to the second joint of your finger). If the soil feels damp, don't water. Keep repeating the test until the soil is barely moist at the 2-inch depth. For smaller pots, 1 inch into the soil is the proper depth to measure.
Water the pot until water runs out of the bottom. This serves two purposes. First, it washes out all the excess salts (fertilizer residue). Second, it guarantees that the bottom two-thirds of the pot, which contains most of the roots, receives sufficient water. However, don't let the pot sit in the water that runs out. After a thorough watering, wait until the soil dries at the 2-inch depth before watering again.
When you test for watering, pay attention to the soil. If your finger can't penetrate 2 inches deep, you either need a more porous soil mix, or the plant is becoming root-bound.
Temperature
Most house plants tolerate normal temperature fluctuations. In general, foliage house plants grow best between 70o and 80o F. during the day and from 60o to 68o F. at night. Most flowering house plants prefer the same daytime range but grow best at nighttime temperatures from 55o to 60o F. The lower night temperature induces physiological recovery from moisture loss, intensifies flower color, and prolongs flower life. Excessively low or high temperatures may cause plant failures, stop growth, or cause spindly appearance and foliage damage or drop. A cooler temperature at night is actually more desirable for plant growth than higher temperatures. A good rule of thumb is to keep the night temperature 10 to 15 degrees lower then the day temperature.
Humidity
Atmospheric humidity is expressed as a percentage of the moisture saturation of air. Two ways to provide increased humidity are by attaching a humidifier to the heating or ventilating system in the home or placing gravel trays (in which an even moisture level is maintained) under the flower pots or containers. This will increase the relative humidity in the vicinity of the containers. As the moisture around the pebbles evaporates, the relative humidity is raised.
Another way to raise humidity is to group plants close together. You can also spray a fine mist on the foliage although this is of doubtful effectiveness for total humidity modification. Do this early in the day so that the plants will be dry by night. This lessens the chance of disease since cool dampness at night provides an ideal environment for disease infection.
Ventilation
House plants, especially flowering varieties, are very sensitive to drafts or heat from registers. Forced air dries the plants rapidly, overtaxes their limited root systems, and may cause damage or plant loss. House plants are sensitive to natural or blended gas. Some plants refuse to flower, while others drop flower buds and foliage when exposed to gases. Blended gases are more toxic to house plants than natural gases. Tomato plants are extremely sensitive to gas. They will turn yellow before the escaping gas is detected by household members and are sometimes used in greenhouses as indicator plants for excessive ethylene gas resulting from incomplete combustion in gas furnaces.
Fertilization
House plants, like most other plants, need fertilizers containing three major plant food elements: nitrogen (N), phosphoric acid (P), and potassium (K). They are available in many different combinations and under a multitude of brand names. Each brand should be analyzed on the label, indicating specifically how much water-soluble elemental nitrogen, phosphate, or potash is available in every pound of the product. The majority of these fertilizers are about 20-20-20. The first figure indicates available nitrogen; the second, available phosphate; and the third, water-soluble potassium. Commercial fertilizers used for house plants are sold in granular, crystalline, liquid, or tablet forms. Each should be used according to instructions on the package label or even more diluted. Frequency of fertilizer application varies somewhat with the vigor of growth and age of each plant. Some need it every 2 weeks, while others will flower well for several months without needing any supplement. As a general rule, use a fertilizer recommended every 2 weeks from March to September. During the winter months no fertilizer need be added at all because reduced light and temperature result in reduced growth. Fertilizing at this time could be detrimental to some house plants.
When applying fertilizer in a solution, make sure that some runs out of the bottom of the pot. This prevents root burn and the buildup of soluble salts or excess fertilizer and reduces the chance of burning the plant.
Soluble Salts
Reduced growth, brown leaf tips, dropping of lower leaves, small new growth, dead root tips, and wilting are all signs of high soluble salts. These salts will accumulate on top of the soil forming a yellow to white crust. A ring of salt deposits may be formed around the pot at the soil line or around the drainage hole. Salts will also build up on the outside of clay pots.
Soluble salts are minerals dissolved in water. Fertilizer dissolved in water becomes a soluble salt. When water evaporates from the soil the minerals or salts stay behind. As the salts in the soil become more and more concentrated, plants find it harder and harder to take up water. If salts build up to an extremely high level, water can be taken out of the root tips causing them to die.
High soluble salts damage the roots directly, and because the plant is weakened, it is more susceptible to attack from insects and diseases. One of the most common problems associated with high salt levels is root rot.
The best way to prevent soluble salt injury is to stop the salts from building up. Water correctly. When you water, allow some water to drain through and then empty the drip plate. Water equal to one-tenth the volume of the pot should drain through each time you water. DO NOT ALLOW THE POT TO SIT IN WATER. If you allow the drained water to be absorbed by the soil, the salts that were washed out are taken back into the soil. Salts can be reabsorbed through the drainage hole or directly through a clay pot.
Plants should be leached every 4 to 6 months. You should leach a plant before you fertilize so that you don't wash away all the fertilizer you just added. Leaching is done by pouring a lot of water on the soil and letting it drain completely. The amount of water used for leaching should equal twice the volume of the pot. A 6 inch pot will hold 10 cups of water so 20 cups of water are used to leach a plant in a 6 inch pot. Keep the water running through the soil to wash the salts out. If a layer of salts has formed a crust on top of the soil, you should remove the salt crust before you begin to leach. Do not remove more than 1/4 inch of soil. It is best not to add more soil to the top of the pot. If the soluble salt level is extremely high or the pot has no drainage, repot the plant.
The level of salts that will cause injury varies with the type of plant and how it is being grown. A plant grown in the home may be injured by salts at concentrations of 200 ppm. The same plant growing in a greenhouse where the light and drainage are good will grow with salts at 10 times that level, or 2,000 ppm. Some nurseries and plant shops leach plants to remove excess salts before the plant is sold. If you are not sure that has been done, leach a newly purchased plant the first time you water it.
MEDIA
The potting soil or media in which a plant grows must be of good quality. It should be porous for root aeration and drainage but also capable of water and nutrient retention. Most commercially prepared mixes are termed artificial which means they contain no soil. High quality artificial mixes generally contain slow release fertilizers which take care of a plant's nutritional requirements for several months. Commercial mixes are often misleading as to content and unsatisfactory. It is better to mix your own if possible.
Preparing Artificial Mixes
Artificial mixtures can be prepared with a minimum of difficulty. Most mixes contain a combination of organic matter, such as peat moss or ground pine bark, and an inorganic material, such as washed sand, vermiculite or perlite. Materials commonly used for house plants are the peat-lite mixtures, consisting of peat moss and either vermiculite or perlite. Here are some comments concerning the ingredients for these mixes.
Peat Moss Readily available baled or bagged sphagnum peat moss is recommended. Materials such as Michigan peat, peat humus, and native peat are usually too decomposed to provide necessary structural and water-drainage characteristics. Most sphagnum peat moss is acid in reaction, with a pH ranging from 4.0 to 5.0 It usually has a very low fertility level. Do not shred sphagnum peat moss too finely.
Vermiculite This is a sterile, light-weight mica product. When mica is heated to approximately 1,800o F., it expands its plate-like structure. Vermiculite will hold large quantities of air, water and nutrients needed for plant growth. Its pH is usually in the 6.5 to 7.2 range. Vermiculite is available in 4 particle sizes. For horticultural mixes, sizes 2 or 3 are generally used. If at all possible, the larger-sized particles should be used since they give much better soil aeration. Vermiculite is available under a variety of trade names.
Perlite This is a sterile material produced by heating volcanic rock to approximately 1,800o F. resulting in a very lightweight, porous material that is white in color. Its principal value in soil mixtures is aeration. It does not hold water and nutrients as well as vermiculite. The pH is usually between 7.0 and 7.5. Perlite can cause fluoride burn on some foliage plants. Fluoride damage is usually seen on the tips of the leaves. The burn progresses from the tip up into the leaf. Fluoride burns can be prevented by adding 1 1/2 times the recommended amount of lime when mixing the soil. A good artificial mix, containing no outside garden soil follows.
Formula (The following materials will make two bushels of mix)
- 1 bushel shredded peat moss
- 2 bushels perlite or vermiculite
- 1/2 cup 8-8-8 or similar analysis mixed fertilizer
- 1 level teaspoon chelated iron
Artificial mixtures are usually very low in trace or minor elements, therefore, it is important to use a fertilizer that contains these trace elements.
CONTAINERS
There are many types of containers from which to choose. A good container should be large enough to provide room for soil and roots, have sufficient head room for proper watering, provide bottom drainage and be attractive without competing with the plant it holds. Containers may be fabricated of ceramics, plastic, fiberglass, wood, aluminum, copper, brass, and many other materials.
Clay and Ceramic Containers Unglazed and glazed porous clay pots with drainage holes are sometimes still used by commercial house plant growers and are frequently left with the plant when it is purchased. Ornate containers are often nothing but an outer shell to cover the plain clay pot. Clay pots absorb and lose moisture through their walls. Frequently the greatest accumulation of roots is next to the walls of the clay pot, because moisture and nutrients accumulate in the clay pores. Although easily broken, clay pots provide excellent aeration for plant roots and are considered by some to be the healthiest type of container for a plant.
Ceramic pots are usually glazed on the outside, sometimes also on the inside. They are frequently designed without drainage holes. This necessitates careful watering practices. Containers with no drainage are not good flower pots. Small novelty containers have little room for soil and roots and are largely ornamental. They should be avoided. It should be noted that putting pot chips, clay pot shards or gravel in the bottom of a pot does not improve soil drainage; they only provide a small space beneath the soil where some excess water can drain inside the pot.
Plastic and Fiberglass Plastic and fiberglass containers are usually quite light and easy to handle. They have become the standard in recent years because they are relatively inexpensive and quite attractive in shape and color. Plastic pots are easy to sterilize or clean for reuse, and because they are not porous as clay pots are, they need less frequent watering and tend to accumulate fewer salts.
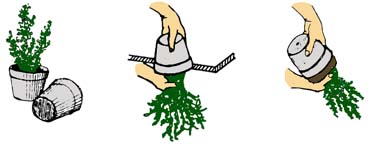
REPOTTING
Actively growing house plants require occasional repotting. This occurs very rarely with some slower growing plants, more frequently with others. Foliage plants require repotting when their roots have filled the pot and are growing out the bottom of the pot.
 When repotting becomes necessary due to these indications by the plant, it should be done without delay. The pot selected for repotting should be no more than 2 inches larger in diameter than the pot the plant is currently growing in; should have at least one drainage hole; may be either clay, ceramic or plastic, and must be clean. Wash soluble salts from clay pots with water and a scrub brush and wash all pots in a solution of 1 part liquid bleach to 9 parts water.
Potting media used should be coarse enough to allow good drainage yet have sufficient water retention capabilities. Most plants are removed easily from their pot, if the lip of the container is knocked upside down against any solid object. Hold your hand over the soil, straddling the plant between the fore and middle fingers while knocking it out of its present container.
Potting media should be moistened before repotting begins. To repot, place drainage material in the bottom of the pot, if desired, and some new soil. If the plant has become root bound it will be necessary to cut and unwind any roots that encircle the plant, otherwise the roots will never develop normally. If the old soil surface has accumulated salts, the top inch should be removed. Set the rootball in the middle of the new soil. Fill soil around the sides between the rootball and pot. Do not add soil above the original level on the rootball, unless the roots are exposed or it has been necessary to remove some of the surface soil. Do not pack the soil, to firm or settle it, tap the pot against a table top or gently press the soil with your fingers.
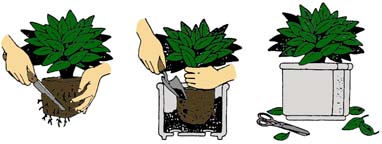
After watering and settling, the soil level should be sufficiently below the level of the pot to leave headroom. Headroom is the amount of space between the soil level and the top of the pot that allows for watering a plant. A properly potted plant has enough headroom to allow water to wash through the soil to thoroughly moisten it.
TRAINING AND GROOMING
This includes a number of minor care activities that distinguish the beginner from the more experienced house plant grower. Pinching is one of them. Pinching is the removal of 1 inch or less of new stem and leaf growth. When it is necessary, pinch to just above the node. This leaves the plant attractive and stimulates new growth. It can be a one-time or continuous activity, depending on the need and the desires of the plant owner. If a plant should be kept compact, but well filled out, frequent pinching will achieve this. Pruning is a similar activity.
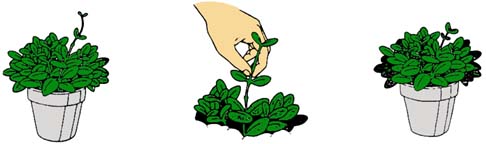 |
| 1. Leggy plant needs to grow bushier, keep more compact form.
| 2. Pinch out growing tips of tallest stem, removing it close to leaf joint.
| 3. New forms just below pinched-out tip, makes plant bushy.
|
Pruning includes removal of other than terminal shoot tips. Sometimes an entire branch or section of a plant should be removed for the sake of appearance. Disbudding is another related care activity. Certain flower buds are removed either to obtain larger blooms from a few choice buds or to eliminate flowering of a very young plant or recently rooted cutting that should not bear the physical drain of flowering early. Ivies and hoya, as well as philodendron and syngonium, are frequently grown in a formal pattern. This can be easily achieved by training them on trellises. It is important to keep plants clean and neat. It not only improves the appearance of plants but reduces the incidence of insects and disease problems. Remove all spent flowers, dying leaves, and dead branches. Keep leaves dust free by washing plants with warm water and mild soap (cover pot to prevent soap from entering the soil). If tips of leaves become brown and dry, trim them off neatly with sharp scissors. Removal of alkali deposits at the soil surface and replacement with clean soil does more for appearance than for the plant itself.
CARE OF SPECIAL POTTED PLANTS
Too little light, too high a temperature and improper watering are the usual causes of failure in caring for gift plants. These plants are grown in a greenhouse where the night temperatures are usually cool, there is ample light, and the air is moist. When these plants are brought into a dry home where the light is poor and the temperatures are maintained for human comfort without consideration for the plants, results are frequently disappointing. Do not expect to hold over a gift plant from year to year. Enjoy them while they are attractive and in season and then discard.
Poinsettia Care The poinsettia requires bright light and should be kept away from drafts. A temperature between 65o and 70o F. is ideal. Avoid temperatures below 60o and above 75o. Keep plants well watered but do not over- water. Some of the newer, long lasting varieties can be kept attractive all winter.
Gardeners frequently ask whether they can carry their poinsettias over to bloom again next year. It is questionable whether the results are worth the effort as the quality of home-grown plants seldom equals that of commercially grown plants. However, for those who wish to try, the following procedure can be followed.
After the bracts fade or fall, set the plants where they will receive indirect light and temperatures around 55o to 60o F. Water sparingly during this time, just enough to keep the stems from shriveling. Cut the plants back to within about 5 inches from the ground and re-pot in fresh soil. As soon as new growth begins, place in a well lighted window. After danger of frost, place the pot out of doors in a partially shaded spot. Pinch the new growth back to get a plant with several stems. Do not pinch after September 1. About Labor Day, or as soon as the nights are cool, bring the plant indoors. Continue to grow them in a sunny room with a night temperature of about 65o F.
The poinsettia blooms only during short days. To initiate blooms, exclude artificial light, either by covering with a light-proof box each evening or placing in an unlighted room or closet for a minimum of 12 hours of darkness. Plants require full light in the daytime, so be sure to return them to a sunny window. Start the short day treatment in about mid-September to have blooms between December 1 and Christmas.
Azaleas Azaleas require direct sunlight to remain healthy. A night temperature of 60o F. will prolong bloom. Keep the soil constantly moist. If the leaves should turn yellow, the soil is not acidic enough. Use an acid fertilizer sold especially for azaleas. Do not use softened water. When repotting, use a mixture high in acid peat moss.
Azaleas can be planted, pot and all, in a shady spot in the garden during the summer months. Examine them frequently and keep them watered during dry periods. Greenhouse azaleas are not hardy, and need to be brought indoors before freezing weather.
Azaleas need a cool rest treatment before they are forced into bloom. Place the plants in a room with a temperature between 35o to 50o F. and filtered light. During this rest period, flower buds will develop. Then place in a well-lighted warm (65o F.) room around January 1 and the plant will bloom. Unless you have the proper growing conditions for the azalea, you should not attempt to carry the plants over.
Gardenia Gardenias grown indoors need special care. They demand an acid soil and should receive the same nutritional care as azaleas. The night temperature should be near 60o F. and the humidity around the plant should be kept high. High temperature and low light intensity will result in flower bud drop.
Amaryllis The secret of growing amaryllis is to keep the plants actively growing after they finish blooming. Keep the plants in full sun, with a night temperature above 60o F. As soon as danger of frost has passed, set the plants in the garden in a semishaded spot. In the fall, before danger of frost bring them in and store them in a cold dark place to rest. They will be ready to force again about January 1. Bring them into a warm light room and water moderately to begin new growth.
Christmas Cactus The Christmas cactus has become increasingly popular with the development of several new varieties. At least 3 related species are sold in addition to a number of cultivars. All have similar cultural requirements.
The secret of good bloom seems to be one of temperature and photoperiod control. They will develop buds and bloom if given bright light, short days, and night temperatures between 55o and 65o F. Christmas cacti bloom best when somewhat pot bound. Repotting is necessary only about once in 3 years. Full sunlight is beneficial in midwinter, but bright sun during summer months can make plants look pale and yellow. These plants grow naturally shaded by a canopy of leaves.
Christmas cacti require less water from October to March than they do when growth is active from April to September. A rest period is very important if plants are to bloom abundantly. Dormancy should be started about the middle of September and continued for 8 weeks. Care should be taken that soil never becomes water logged during the dark days of winter.
Cyclamen Cyclamen require full sunlight and a night temperature of between 50o and 60o F. They are heavy users of water and must be watered whenever the surface of the soil is dry. Flower buds will fail to develop if night temperature is too high or if light is poor.
Cyclamen can be carried over, but as with the poinsettia, homegrown plants are seldom equal to those grown by a commercial grower. Let the plants die down after they finish flowering. Repot the fleshy corm in June with the top of the corm above the soil line. Allow resting bulbs to dry but not become shriveled.
|